Fleet 80 Canuck
(Not available for viewing)
The beginnings of the Fleet Model 80 Canuck go back to 1939, when J. Omer (Bob) Noury, an air engineer with the Ottawa Flying Club, decided to design and build a light aircraft for the Canadian market. The aircraft was a high-wing monoplane of conventional structure using a welded steel-tube fuselage and tail surfaces, and powered with a 65-horsepower Continental flat four-cylinder engine. The Noury T-65 Series 1 design was first flown on January 21, 1940. The aircraft was given a certificate of airworthiness and Noury sold it in 1941.
In 1942 he formed Noury Aircraft Ltd. at Stoney Creek, with himself as president and general manager. His intent was to design and build a light aircraft based on his own monoplane design. The Noury N-75 featured side-by-side seating and a 75-horsepower Continental engine. It was test flown from the Hamilton Airport at Mount Hope late in 1944.
Fleet Aircraft felt that the side-by-side design aircraft met most of their specifications, so in May 1945 they purchased the prototype and design rights for the plane from Noury Aircraft.
The Noury was shipped to Fleet's facilities at Fort Erie and test flown by Fleet's test pilot, Tommy Williams, on June 4, 1945. This resulted in modifications to the forward fuselage geometry, lowering the engine four inches to improve the forward visibility, and moving the engine forward four inches to allow the relocation of the fuel tank from the centre section of the wing to the forward fuselage. This made possible the installation of a clear skylight in the cabin roof. The original Continental C-75 engine was replaced by a more powerful Model C-85, and a new fin and rudder were installed. The Canuck was first flown in its modified form on September 26, 1945.
The side-by-side seating in the Fleet 80 Canuck was unusual for the period even though it was a far better arrangement for instruction than placing the instructor either in front of or behind the student.
Between 1945 and 1948, 198 Canuck aircraft were built by Fleet. The Canuck proved popular and initially sold well to flying clubs, charter companies, and private owners in Canada. In addition 24 were exported. By late 1947, plagued by postwar financial difficulties and the sales slowdown that affected all aircraft manufacturers, Fleet was forced to terminate production of the Canuck model.
The Museum's Canuck was flown in Alberta for about 20 years before joining the Museum in 2003.
Technical Details:

What's the view like from the Canuck? Pretty darn nice!

The Canuck in the air
The summer weather is prime time for building flight time on the Museum's latest restoration
- the Fleet Canuck.


The Canuck Flies Again
After a monumental effort by a dedicated team at the Museum the beautifully restored Fleet 80 Canuck took to the air again on 21 June, 2017. It has now officially changed status from the 'Restoration' file to the 'Active' file. Museum pilot, Bill Findlay, who learned to fly on the Canuck at the Pitt Meadows, BC airport in the 1960s was the test pilot. His smile at the end of the flight told the tale...

More on the Fleet Canuck story
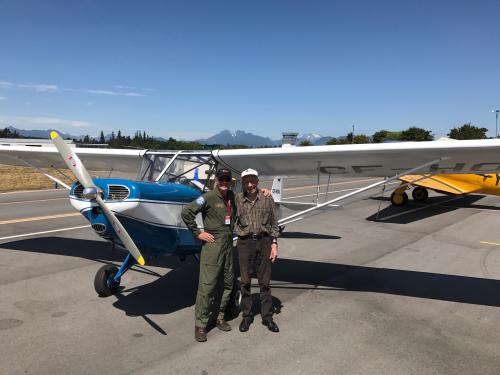
As the Canuck was readied for flight it was re-united with its donor - Hank Koehler. Hank bought the aircraft in poor condition and donated it to the Museum. It has been a long-time restoration effort by Museum volunteers. As recorded earlier, the Canuck is flying again. Now the donor and aircraft have been re-united. As more flight time is accumulated, Museum members will be able to fly in the Canuck and hopefully Hank will be one of the first.
 Hank (left) with pilot, Bill Findlay, as they left on a short tour of the airport.
 Bill and Hank shown with the Canuck.


Progress Report, November 2015

Progress Report, September 2015


Progress Report, July 2015


Progress Report, June 2015


Progress Report, May 2015


complete coverage. These protect the fabric against UV rays.
Progress Report, April 2015


Progress Report, February 2015


Progress Report, May 2012

Progress Report, March 2012
Things are moving along at good pace over at Ray's place. More photos will be posted as they come.

Big thanks to Ray and his team for an awesome job
The Canuck fuselage is finally home in the CMF hangar!

April, 2012 - Masking removed, paint scheme takes shape!

April, 2012 - masking removed
April, 2012 - Blue coat goes on

April, 2012 - Front cowl and gear installed to setup the masking for the pattern

April, 2012 - White coat goes on

first coat complete ~ March 15, 2012

Ray starts the first coat of silver ~ March 15, 2012

tail all tied together nicely ~ March 15, 2012

Masking/taping just about done and ready for spray coats ~ March 13, 2012


Bill (rear) and Ray (front) turn the Canuck fuselage


Progress Report, Feb 2012


Ralph, Terry, Ray and Bill ~ Ray cutting the first length of fabric

A look inside at the Canuck's flight controls
Progress Report, July 2011
Progress Report, April 2011
The wings have been trial fitted to ensure the alignment of all components. If you are wondering why you can see through the Canuck's skeleton, it is because of the typical construction methods of the 1940s. The fuselage is steel tube with wooden battens used for shaping, the whole lot then being covered with cotton. These days we use a modern, long-lasting synthetic fabric covering. The wings are aluminum alloy structure also covered with fabric. Many coats of special finish are applied to make the covering aerodynamically smooth and long lasting.


Progress Report, March 2011


The final work on the wings is under way.

Progress Report, July 2010

Progress Report, May 2010

Progress Report, October 2009

Progress Report, November 2008


